
Basement Waterproofing From the Inside Out: Methods, Limits, and When Each Applies

Key Takeaways
- Interior sealants stop minor condensation and surface seepage but cannot block hydrostatic pressure.
- Interior drainage systems manage water that has already entered rather than preventing entry.
- Exterior waterproofing is the most comprehensive solution but involves significant excavation and cost.
- Grading and gutter corrections should always be addressed before investing in more expensive systems.
- The source of water - surface runoff versus a rising water table - determines the right fix.
Why Basements Let Water In
Basements sit below grade, surrounded by soil that absorbs and holds rainwater and snowmelt. Over time, two distinct forces drive moisture into the space: hydrostatic pressure (water-saturated soil pushing against the foundation) and capillary action (water wicking through porous concrete). A third source - condensation - is sometimes mistaken for a leak but originates from humid interior air contacting cool walls.
Before choosing any waterproofing method, confirm which type of water intrusion you have. A simple test: tape a piece of plastic sheeting to a suspect wall for 24-48 hours. If moisture forms on the room-side surface, the problem is condensation. If it appears behind the plastic against the wall, water is migrating through the foundation material. This distinction matters because solutions that work for one problem often do nothing for another.
Condensation vs. Infiltration: Know Before You Spend
Misidentifying the water source is the most expensive mistake in basement waterproofing. A homeowner who applies an interior coating to address what is actually hydrostatic pressure will see it fail - sometimes within a single wet season. Always perform the plastic sheeting test, and if in doubt, have a professional inspect the foundation before committing to any solution.
Interior Sealants and Coatings
Hydraulic cement and masonry waterproofing coatings are the entry-level interior options. Hydraulic cement expands as it cures, making it useful for plugging active cracks and holes where water is visibly seeping. Masonry coatings - thick, paint-like products - fill small pores in block or poured concrete walls, reducing vapor transmission and minor surface dampness.
Where they work: condensation control, surface seepage from minor capillary action, and sealing hairline cracks. Also see our guide on sealing gaps around windows and doors, which complements interior moisture control efforts.
Where they fail: Neither product withstands sustained hydrostatic pressure. If soil surrounding your foundation becomes saturated after heavy rain, pressure will eventually push water through or around any interior coating. Sealants applied over a wet, actively leaking wall typically debond within one to two seasons. They are a complement to a proper drainage strategy, not a replacement.
Before applying any masonry coating, dampen the wall surface - most hydraulic and masonry products adhere better to a moist surface than a completely dry one. Follow the manufacturer's cure time exactly before testing.
Premature exposure to water before the product fully cures significantly reduces adhesion and long-term effectiveness, which is one of the most common reasons DIY sealant applications fail early.
Test your sump pump at least twice a year - once before spring thaw and once before the fall rainy season - by slowly pouring water into the pit until the float triggers the pump.
Sump pumps that sit idle for months can seize or lose prime, and discovering a failed pump during an active flood is far costlier than a routine five-minute test.
Interior Drainage Systems and Sump Pumps
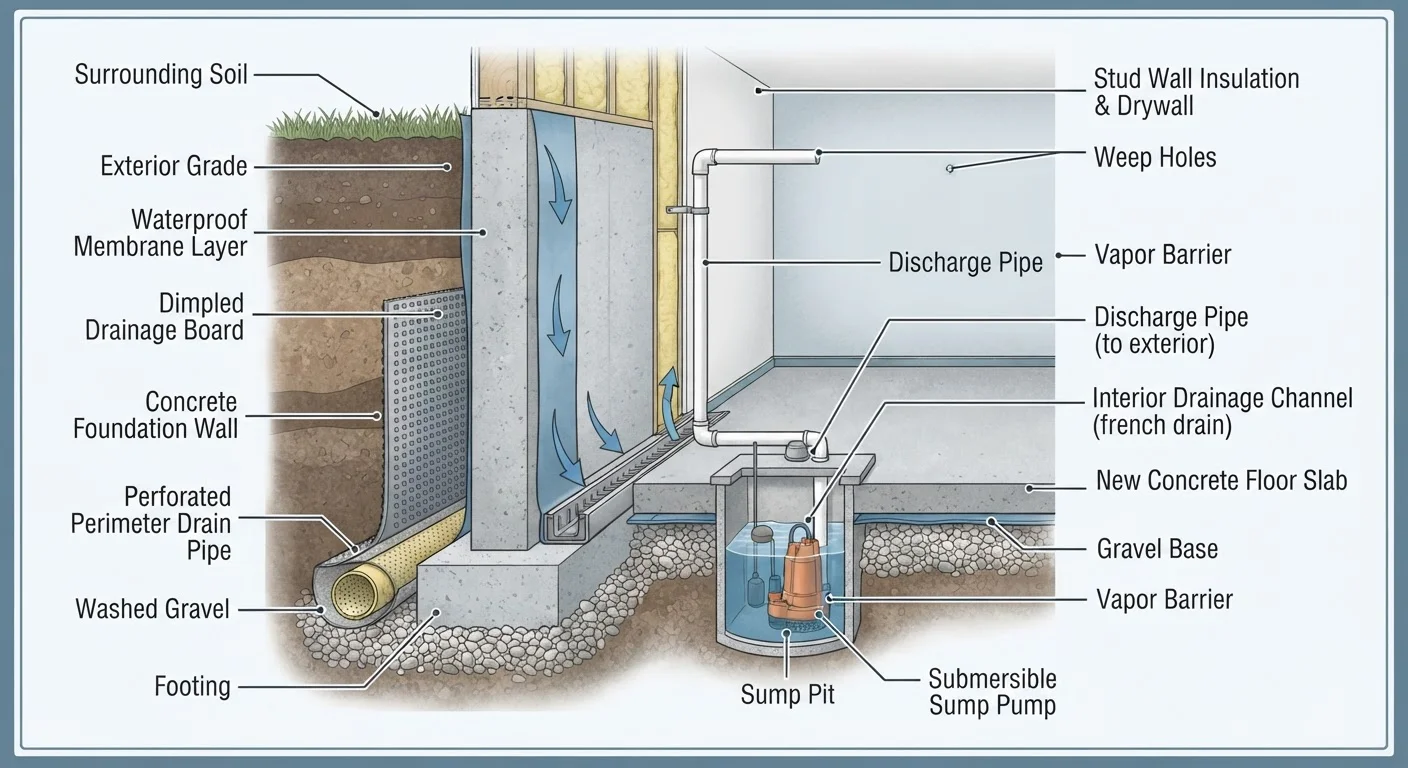
When hydrostatic pressure is the culprit, an interior drainage system - sometimes called a French drain or footing drain - is one of the most widely used solutions. A channel is saw-cut around the basement perimeter at the footing level, a perforated pipe is laid in gravel, and water is directed to a sump pit where a sump pump discharges it away from the house.
This approach does not stop water from entering the wall; it intercepts water at the base before it can spread across the floor. That distinction is important: interior drainage manages the problem rather than solving it at the source. However, in many older homes where exterior excavation is impractical, it is a highly effective and durable long-term management strategy.
98%
Of basements experience some water intrusion
According to the American Society of Home Inspectors, nearly all basements will experience water intrusion at some point over their lifetime.
$4,000-$10,000+
Typical interior drainage system cost
Cost varies by basement size, regional labor rates, and whether concrete removal is required; estimates from industry sources suggest this range for average US homes.
6 inches
Recommended slope away from foundation
Building industry guidance generally recommends a six-inch drop over ten feet of grade to direct surface runoff away from the foundation.
Sump pump considerations: A battery backup or water-powered backup pump is strongly advisable, since power outages during heavy storms - the exact moment a pump is most needed - are common. Sump pits should be fitted with airtight lids to limit radon and humidity migration into living areas.
Exterior Waterproofing and Excavation
Exterior waterproofing addresses water before it reaches the foundation wall, making it the most thorough approach available. The process involves excavating soil around the perimeter of the home down to the footing, cleaning and repairing the foundation surface, applying a waterproof membrane or coating, installing a drainage board to carry water downward, and placing a perforated drain pipe at the footing to route water away.
When it is warranted: structural cracks that require repair from the outside, homes with a consistently high water table, or cases where interior methods have repeatedly failed. Exterior work also creates an opportunity to inspect and repair deteriorating foundation walls before water damage compromises their integrity.
The trade-offs are substantial. Excavation costs are significant and vary widely by region, soil type, and how deeply the foundation is buried. Landscaping, walkways, decks, and utility lines near the foundation can complicate or increase the scope of the project. Homeowners should obtain permits where required - check with your local building department, as excavation near a foundation often triggers inspection requirements.
Grading, Gutters, and the Free Fixes First
Before spending money on any waterproofing system, evaluate the site conditions that may be funneling water toward your home in the first place. These corrections are often low-cost yet dramatically reduce the volume of water that reaches your foundation.
- Grading: Soil around the foundation should slope away from the house - a general guideline is a drop of roughly six inches over the first ten feet. Flat or inward-sloping grade concentrates roof and yard runoff directly against the foundation.
- Gutters and downspouts: Clogged gutters overflow at the roofline and saturate the soil immediately adjacent to the house. Downspout extensions or underground drainage pipes should carry water at least four to six feet from the foundation before discharge.
- Window well drainage: Basement egress windows with poorly drained wells can fill during heavy rain and create direct entry points for water.
Addressing these issues first is not just cost-effective - it is logical. An interior drainage system sized for heavy water intrusion may be unnecessary once surface water is redirected. Professionals often recommend correcting grading and gutters before any diagnostic assessment of the foundation itself.
Matching the Method to the Problem
No single waterproofing method fits every basement. The table below summarizes how common water problems align with appropriate solutions:
| Water Source | Recommended Approach | DIY Feasibility |
|---|---|---|
| Condensation / humidity | Dehumidifier, vapor barrier, improved ventilation | High |
| Minor surface seepage | Masonry coating, hydraulic cement crack repair | Moderate |
| Active hydrostatic pressure | Interior drainage system + sump pump | Low to Professional |
| Structural cracks, high water table | Exterior waterproofing with membrane and drain | Professional required |
| Surface runoff concentration | Regrading, gutter extensions | High |
When symptoms are unclear or multiple water sources seem involved, a licensed waterproofing contractor or structural engineer can provide a written assessment. Be cautious of any diagnosis that begins with a product recommendation rather than an inspection - a thorough evaluation of where, when, and how water enters the space should always come first.
Basement moisture is a manageable problem for most homes. Understanding the hierarchy of solutions - from simple drainage corrections to full exterior membrane systems - allows you to make decisions that are proportional to the actual problem and the realistic limits of each method.